发热毯
产品描述
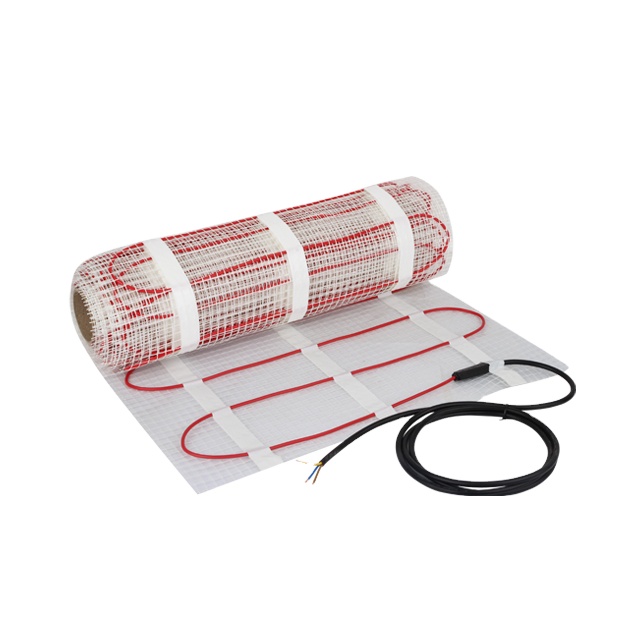
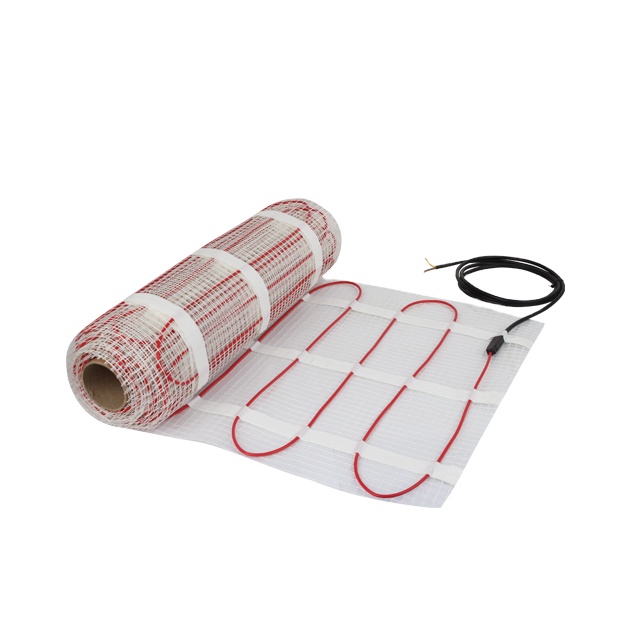
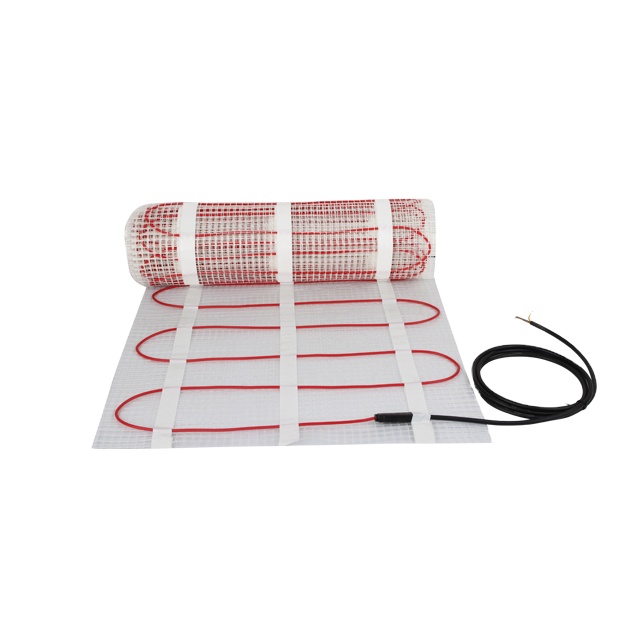
Underfloor heating mat for your tile and wood floor
Description Table
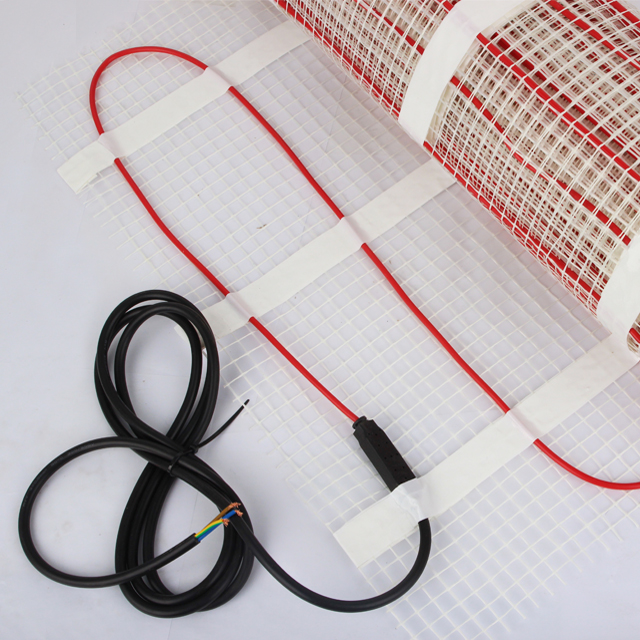
| Cable Construction: | Twin Pure Copper Conductor |
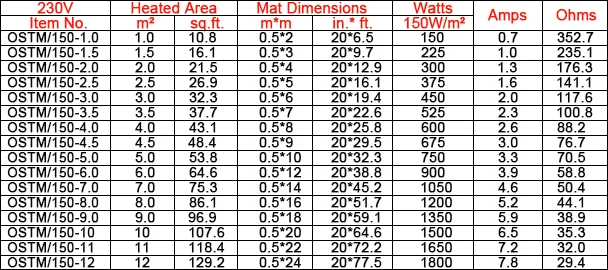
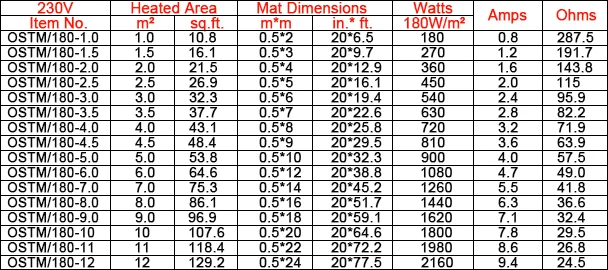
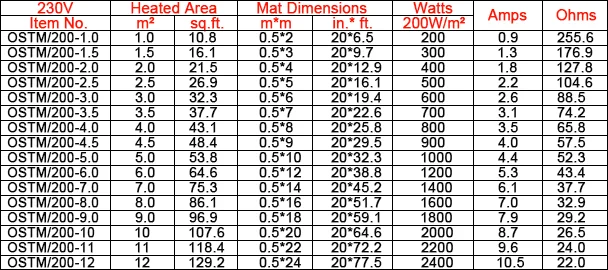
| Rated Voltage: | AC: 110V/220V/230V |
| Output Power: | 150W/SQM, 180W/SQM, 200W/SQM |
| Heating Cable Outside Diameter: | 3.6mm |
| Material of Heating Cable's Inner Insulation: | FEP |
| Material of Heating Cable's Outer Jacket: | PVC |
| Max. Ambient Temperature: | 85F/30C |
| Min. Installation Temperature: | 40F/5C |
| Cold Lead Power Cable: | length: 2.0m, spec.: 3x1.5sqmm |
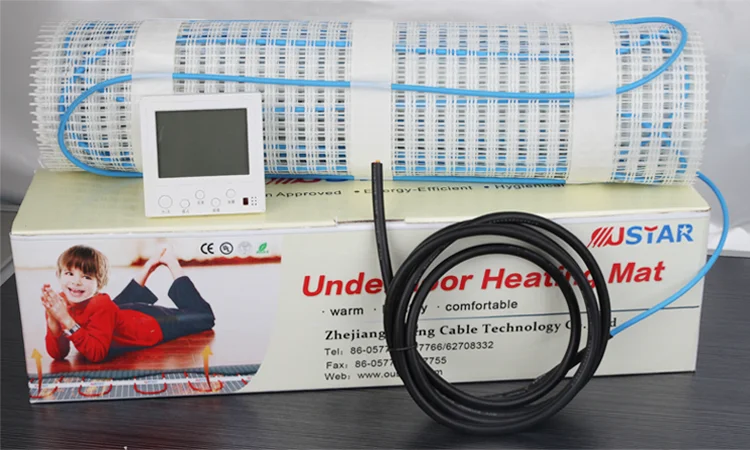
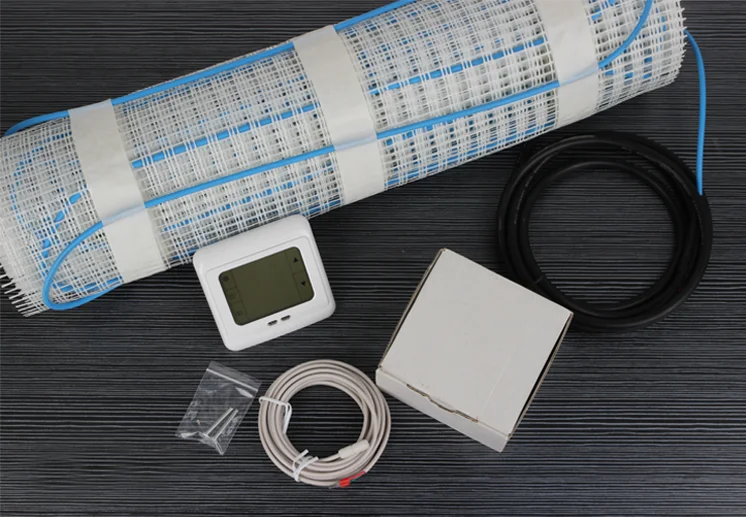
Price includes:
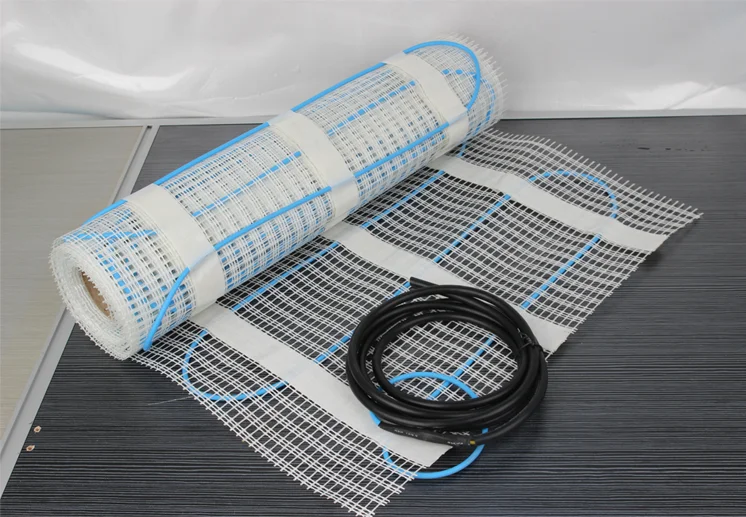
1. Amazing warm underfloor heating mat. Easy fit with self-adhesive mesh.
2. One piece of cold lead power cable at 2.0m length by 3x1.5sqmm.
3. Comprehensive installation manual.
What we have for you: 150W-180W-200W/SQM
Advantages:
There are various types of heating including natural or propane gas and oil, but electric heat, though not always the most efficient cost-wise (depend on your electricity rates), is probably the most common, mainly because it is readily available in most areas.
Compared to other heating systems, the investment costs for electric underfloor heating are extremel low. Customized installation of the heating elements means that only the selected areas are heated. This an added source of savings.
Features & Benefits
1. Dual core with simple single connection point, easy to install.
2. The 3.6mm thin heating cable keeps the raise in the floor height to minimum.
3. Various sizes of floor heating mats are designed to fit the heated area of any type floors.
4. Tough fluoropolymer conductor insulation with hard PVC outer insulation ensures the durability.
5. 100% armoured earth coverage to entire wire offers safety & peace of mind.
6. Cold lead cable at 2.0m length and 3x1.5sqmm is connected to the heating cable end so to keep safety from the high temperature.
7. Two conductor constuction emits no harmful EMF.
8. Complete all-in-one with mat (glass fiber mesh) and cable facilitates convenience in plastering finish.
9. Flexibility--possible to flexibly install in any shape at any place.
10. Separate control for each area.
11. Genuine full 10-year manufacture experience backs up the heating mat guarantee.
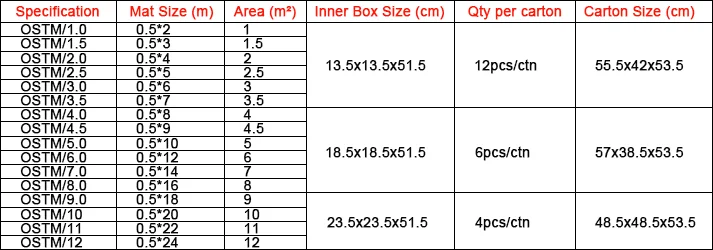
How we making & packing:

How to choose the correct and needed heating mat for your house?
(The correct size is required as the wire CANNOT be reduced or extended)
Step1: Measure the heated area
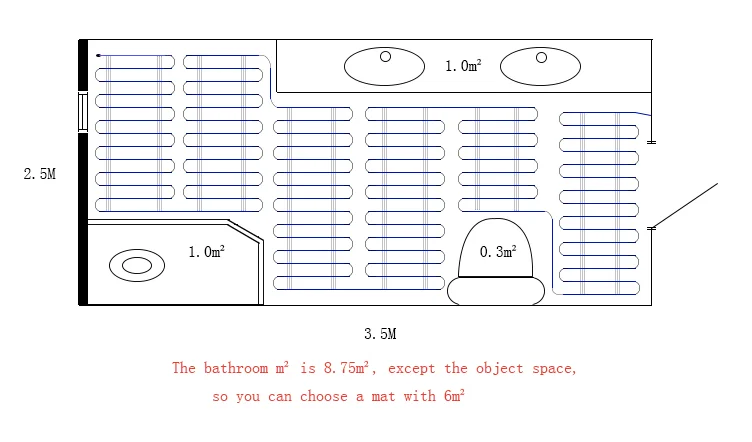
Determine the heated area of the floor where there are no permanent fixtures or furniture such as showers, toilets, vanities, or cabinets. Measure the heated area of the floor.
(For example: the area of the bathroom is 8.75m2. When you subtract the area of the vanity, shower and toilet, the total heated area is only 6.45m2)
Step2: Determine the power supply voltage
Make sure the supply voltage is the one you need. 120V/220V/230V
Step3: Plan the design
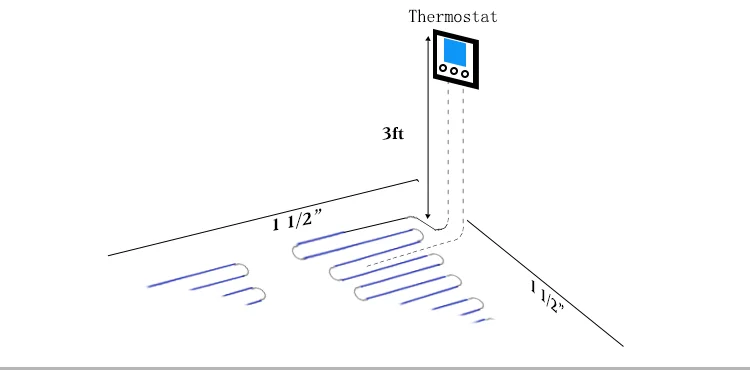
Determine the optimum floor heating mat layout for your heated area to ensure coverage. Select a spot for the thermostat in the wall above the heated area where it can be reached by the 2.5m cold lead on the heating mat, and the floor temperature sensor.
Step4: Confirm your product selection
Confirm that your heating mat is no larger than the heated area. For example, if the heated area is 6.45m2, select the 6.0m2 heating mat system.
How to install the heating mat?
You will require the following items to install and test the system:
·Scissors
·Utility knife
·Wire strippers
·Tape measure
·Screwdriver
·Multimeter
You will also need the appropriate tools and materials to install your particular floor. Likely including products like self-leveling mortar, thin-set mortar, backer board, tile, a notched trowel, and any other tools for your specific floor.
Step1: Plan layout
Make a sketch layout or a floor plan of the room, including all permanent furnishings. Indicate all dimensions required to determine the available floor area and the position of the thermostat.
(We recommends that the installation is documented with photos to note the location of connections and the sensor.)
Step2: Transfer layout to floor
Draw an outline of the layout on the room floor including a foot print of all furnishings that are not yet installed. Unroll the first few feet of the heating mat. The starting point of the cable must be placed within 2.5m from the thermostat.
Step3: Install sensor
If using a floor temperature sensing thermostat, install the sensor now, either in conduit tube, or directly to the subfloor.
(It is recommended that the sensor be installed in conduit tube. This will allow the sensor to be easily replaced in the unlikely event of failure. The sensor and/or tube needs to be installed between the thermostat wall box and the sensor position. The conduit tube must be partially countersunk into the subfloor. Cut a channel approximately 8cm deep X 8cm wide in the floor and wall up to the thermostat for the sensor conduit. The conduit has to go from the thermostat and minimum of 25cm away from the wall towards the middle of the floor.)
Step4: Prepare subfloor surface
Clean and vacuum the floor thoroughly and remove dust and debris from the floor that may damage the heating cable.
Step5: Measure the resistance(The first time)
Use a digital ohm meter to measure the resistance of the heating mat.
Step6: Begin laying the heating mat
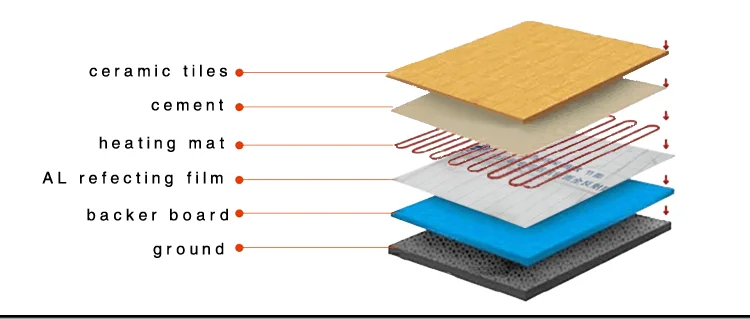
According to your different demand, you can choose firstly place such as backer board, then reflecting film, finally place the heating mat such that the connection point and the sensor are in their intended positions and bring the power cable to thermostat or connection box.
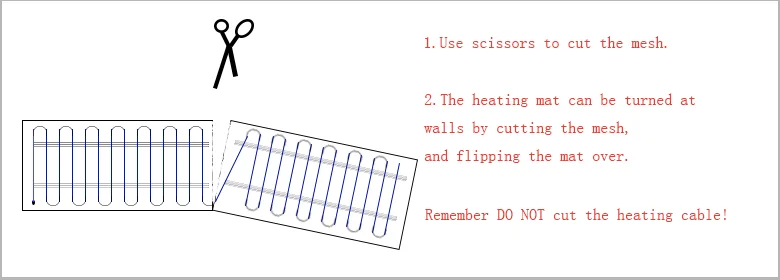
Begin unrolling the heating mat evenly across the floor outside the areas that you marked previously. When you reach the next wall, cut the mesh, turn the mat, and begin rolling in the desired direction.
(NEVER CUT OR SHORTEN THE HEATING CABLE! Ensure that the mat is in full contact with the subfloor at all times. Avoid walking on the mat! If this is not possible, Pease use shoes with soft soles!)
When approaching obstacles(toilets, cabinets, etc), carefully remove some of the heating cable from the mat and lead the cable around the obstacle. In some cases pieces of the mesh will be cut away entirely. Remember to never cut the cable. Use hot melt glue or a thin strip of tape to secure the loose cable to the floor. It is highly recommend to take photos of the installed heating mat before installing the flooring.
Step7: Measure the resistance(the second time)
Refer to Step 5.
Step8: Install floor covering
Ensure that the sensor conduit has been properly installed before proceeding (See step 3).
In the case of tiles, proceed with the installation of the tiles by covering the heating cables with a layer of thin-set cement as directed by the tile manufacturer. Ensure that the thin-set mortar covers the entire height of the heating cable as the tiles are installed. In the case of a wood, engineered or laminate floor covering, it is recommended that the flooring manufacturer be contacted. For wooden floors, a minimum of 5cm of self-leveling cement over the heating cable is recommended. Ensure that all moisture in the self-leveling cement has been fully eliminated in accordance with the drying times recommended by the manufacturer(for exact drying time).
(The system must not be turned on until the thin-set cement has fully dried. A minimum of 2 weeks is recommended.)
Step9: Measure the resistance(The third time)
Refer to Step 5.
Step10: Install the tile
To install the tile, apply a layer of acrylic or latex modified thin-set using the ridged side of your trowel. Tile and grout the floor using best industry practices and in accordance with instructions provided by the manufacturer of the tile.
Step11: Connect power supply and thermostat
The connection of the power supply and the thermostat must be done by qualified electrician. The electrician should connect the floor sensor to the thermostat, take the final resistance reading.
(You need to mark the appropriate circuit breaker reference label indicating which branch circuit supplies the circuits to those electric space heating cables.)
Step12: Measure the resistance(The fourth time)
Refer to Step 5.
Step13: Enjoy the comfort of heating mat
FAQ:
a). Is electric heating system a big consumer of electricity?
The running cost of a heating mat will depend on the following conditions.
1). How well insulated the room is;
2). The output and type of system;
3). The energy tariff in your country;
4). The thermostat settings of your choice.
Below is the examples of monthly running electricity consumption for standard 12w/m 150w/m2 electric heating mat.
Room Type Heated Area (sq.m) AM Heating Hours PM Heating Hours Monthly Electricity consumption
Bedroom 15 3 3 405kw/h
Bathroom 3.5 0 2 31.5kw/h
Kitchen 6 0 2 54kw/h
Lounge 25 1 2.5 393.75kw/h
b). What are the floor material requirements for installing the Floor Heating Mat System ?
·Laminated boards
·Tiles
·Marble
·Vinyl boards
c). Does each room require its own thermostat?
We would recommend that each room has its own heating system controlled by its own thermostat. This will allow for simpler and more accurate temperature of each room and will avoid heating rooms which do not require it.
d). How long will it take for the underfloor heating system to warm up?
It will be dictated by the insulation used beneath it and the output of the system. Generally, the better insulated the sub-floor, the faster the system will warm up, with backer board, facilitating a very speedy warm up time of as little as 15 minutes, and un-insulated concrete floors causing the slowest time.